I love the crochet designs and kits from Janie Crow. It took me a while to complete this one but I am delighted with my gorgeous blanket. Janie’s kits are always fabulous and with clear pictorial instructions for those of us that are not as experienced.
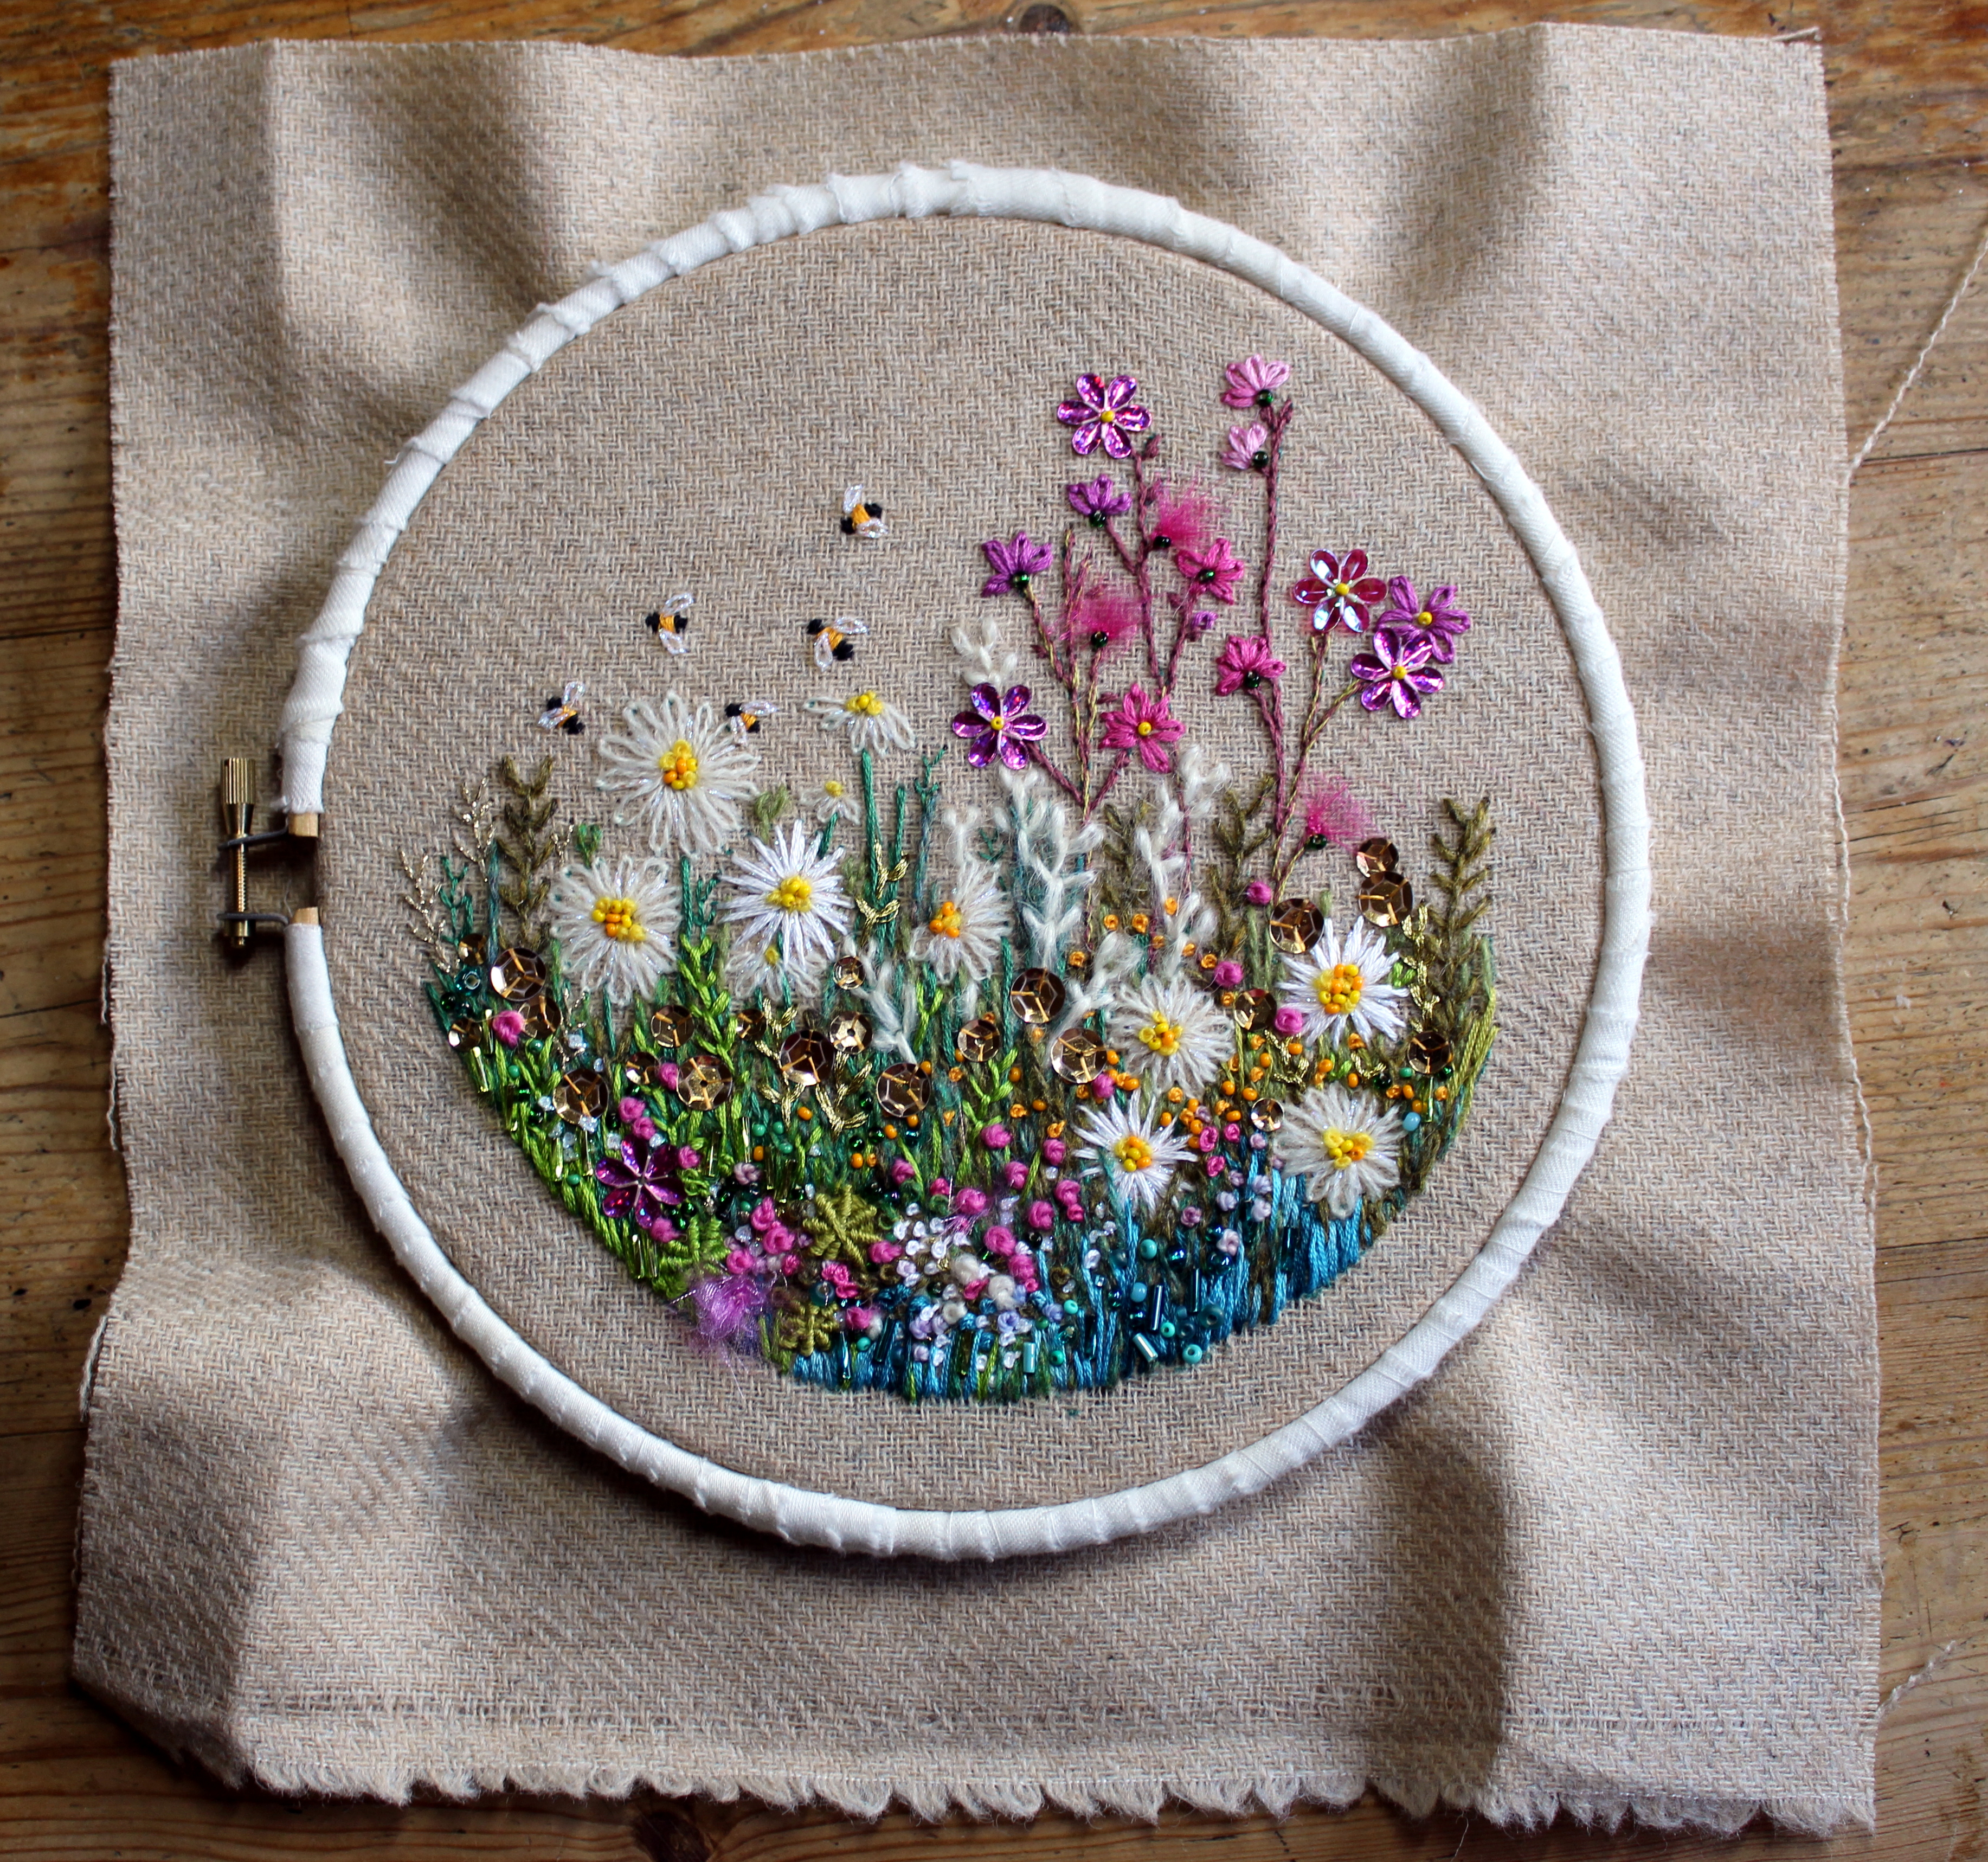
Often with my embroidery I work very precisely, either using counted thread methods or other traditional surface embroidery methods trying to achieve super neat and precisely placed stitches as I work. I saw this lovely Red Camions and Daisies Kit from Rowandean and just had to treat myself.
The kit comes with a lovely easy to stich background fabric with basic printed guidelines and a gorgeous selection threads (stranded cotton, perle, wool, knitting yarns and metallic). The kit also includes organza, sequins and beads to further embellish your design and add more interest and texture. A selection of simple stitches are used including straight, fern, lazy daisy and french knots (for absolute beginners there is a guide on how to work these). The instructions give a guide as to where to place the various stitches and which threads and colours to use but these are worked freely. There is no stress over exact placement of stitches or using the exact threads etc. but you are encouraged to just ‘go for it’ and enjoy the process.
I did feel a little out of my comfort zone working in this way but as soon as I got started I just relaxed into it. I almost got the jitters snipping and distressing the bits of organza and adding them in along with random sequins and beads (ha ha ha) but adding them actually ‘worked’ and gave a lovely added component of shimmer and texture.
I really enjoyed stitching this kit and was surprised at just how quickly it came together. I think that I need to incorporate more of this free style embroidery into some of my future projects – so liberating and relaxing to work.
Delighted with the results – hope that you enjoy seeing it too.
Tonight I am sharing a shawl embellished with Teneriffe Lace and block printing that I made using the Vandyke Border Loom from Gina B Silkworks. I made this a couple of years ago for one of Gina’s TV shows demonstrating the technique. Gina has another lace show on Create and Craft TV tomorrow at 1pm (26th April on Freeview Channel 85 or watch catch up online via their website) featuring many looms for creating round, various mandala style shapes and the border looms.
I hope that you enjoy seeing this project. I really enjoyed making this.
Materials:
Lime green crochet cotton no.3 (Delfino – Filo Di Scozia)
Lilac DMC Mouline Cotton (like a standard 6 strand embroidery floss but on a large spool)
Sewing thread and needle (lime green)
Lime green cotton triangular shawl (made from quilting cotton) with sides measuring approx. 1m (I overlocked the edges using matching thread to prevent fraying)
Thick dense foam mat (such as provided with Gina’s Total Trimmings Table) or upholstery foam (optional if wanting to use pins for stretching the web)
Decorative Indian wooden printing block and foam printing mat (Colouricious). The one I chose from my stash was approx. 9.5cm square with space in the centre to add the lace floral motifs
Setacolor Opaque (Spring Green, Raspberry and Parma Violet) and Deka Perm (Opaque White) fabric paints
Kitchen sponge and paint tray
Iron
How to do it:
Gina’s loom kits provide general instructions for stretching the web, darning, reverse backstitch and knotting etc.
Note: The hardest part to get right is the Teneriffe Lace Knot which holds it all together. Get this wrong and your lace won’t hold together properly when you remove it from the loom. Should this happen, don’t despair, do what I did with my first lace attempts and glue it to a card or a mixed media canvas. Ha ha.
I spent quite some time developing the lace pattern by quite a lot of experimenting, undoing and redoing until I was happy with the result. Don’t be afraid to play. Gina has also provided some easy starter lace borders in the instructions so you could try these first and make up a couple of smaller projects first.
The Border Lace:
Whenever thread ends were tied and finished, or working threads joined with knots, I added a small dab of clear drying fabric glue for extra security. This is optional but I thought it would ensure no loosening of thread ends, particularly during lots of wear and washing etc.
Starting: I stretched the web on the Vandyke Border Loom leaving a long end at the start and keeping the ball in place on the left hand side (to avoid making joins as the border is continued). Here I have wrapped the thread end a couple of times around the loom end to hold the tension in place.
I made an angle on the first end so that it would continue on the shape of the shawl corner. The pins were placed on a diagonal and threads held together by K 2e (knotting 2 threads to hold).
Note: When working some of the bigger projects I prefer to use pins to hold the web rather than lacing with waste thread. It is a little less portable in this method but much quicker to stretch the web.
Row 1: I worked a row of sc (scalloped edge by k 2e to create small anchored loops) along the bottom edge, joining in a new thread as required.
Row 2: Next I worked a row of K 2e (keeping the pairs of threads in alignment with the first bottom row of knots) along the centre of the lace band.
Note: For each row I joined a new length of yarn. Once worked this was loosely wrapped and tied (to prevent tangling) and kept on the left hand side, ready to work the next section of the lace as the lace is moved on along the loom.
Row 3: I then worked a row of sc along the top edge. See how the threads now separate to give a lacy effect. Again I joined a new thread for this row.
Row 4: A row of k 4e (4 threads knotted together such that the groups of knotted threads aligned with the peaks and troughs of the top edge) was worked in the centre of the bottom straight border section. This opened out the threads into a pretty lace design.
Row 5: A row of *k 2e (x3), k 4e (x1), K 2e (x3)* was repeated along the top border. The 2e knots were worked just below the knots on the sc edge and the 4e knots were worked about half way down the space. This created a nice section with 7 little spaces, ideal for darning (weaving) in the next row.
Row 6: Next I joined in the lilac thread. To start I knotted just under the threads of the previous row until reaching the centre of the 7 space section.
Row 6 continued: The 7 space section was progressively darned (pdt) for 8 rounds. The thread was taken under 1, over 2, under 2, over 1, under 1, then over 2 and under 1 to complete the first round (starting at the top left hand side single thread). As the rounds are worked the weave goes in the opposing over/under direction naturally (as there is an odd number of thread groups/spaces).
When 8 rounds were complete the thread was taken under the first thread bar again before moving along to the left with knotting.
Full row 6 repeat: *k 2e (x3), k 4e (x1), pdt (x8) in the round, u 1e, K 2e (x3)* repeated along the top border.
These 6 rows form the pattern repeat for the straight border sections. The straight knotting rows are quite quick to work but the darning does take a little longer. Well worth it though I think.
The lace was then removed from the loom ready to work the next section.
The first few loops were replaced onto the end of the loom and the next section of web was stretched ready to work. Here you can see the ball kept in place (keeping the web continuous without thread joins). The working threads were loosely tied for each row (keeping them separate, tying in a new length as required).
The next section of lace was then worked as given above.
Again the lace was moved along as each section was completed. I was so excited to see it grow.
I had calculated that I would need 25 little peaks to fit along the sides of my scarf before needing to turn the corner (the space between each peak being approx. 4cm and the sides of my scarf being approx. 1m).
Note: The lace does pull in slightly when removed from the loom (the amount will vary depending on stitches used). Bear this in mind and check that the length of your lace is OK before turning the corner (particularly on a large project).
As with the straight border I pinned the first few loops of lace onto the corner loom and laid out the pins ready to stretch the web.
I stretched the web on the first half of the corner then spent some time thinking – how was I to make a corner pattern that would continue the straight sections nicely? This took me some time – ha ha.
The threads on the corner diagonal of the web need to be interlocked. I therefore broke the thread and stretched the next section of the web, threading up the needle and passing through the loops of web on the diagonal (Gina explains this in her instructions). I then tied the thread end back to the ball end of thread.
I had a lot more thinking here about where to go next – tee hee.
I worked rows 1-4 as previously adding extra knots where the diagonal threads crossed to make sure that the intersection was well anchored.
I then started row 5 and had a lot more thinking on the corner section. The full peak sections on either side were to be completed in the same pattern but I wasn’t sure what to put in the corner. I liked how I had continued the bottom border section keeping the design cohesive.
Continuing row 5: After the first 3 knots (worked as per the normal pattern) I then moved to the centre and knotted up one side of the diagonal and back down the other (k 2e). This anchored all the threads well on the upper part of the diagonal. Note that I split the thread groups (see above where the outer threads are grouped together on the web) to make a lacy effect. I hope that this makes sense. It is difficult to explain – sorry.
Continuing row 6: I worked the first peak in the same way as usual then worked 3 knots up the outer edge (as in a normal row start). See picture below.
The corner was completed by weaving 2 little ‘leaf’ sections across the diagonal threads. Starting at the tip I wove down to the middle (filling the space), then up the other side and then 3 knots were worked down to the trough section as normal. The next section being worked as per the normal pattern.
The lace was then removed from the corner loom and replaced back onto the border loom ready to work up the other side (as shown above).
Here you can see the full length of one border and the corner turned ready to work the other side. I got very excited here – ha ha.
Here is a close up where you can see the corner more clearly.
Although fairly pleased I still wasn’t completely happy with it (more thinking! Ha ha).
I took the lace back off the border loom and quickly anchored it back onto the corner. With a new length of thread I added a little circle of weaving (over 5 groups of thread). I was happier with the result now.
I continued with the usual pattern until the last section. Here I again wanted a diagonal finish on the end.
Here I have shown the corner of the scarf so you can see what I mean. The loom is not designed to make diagonal ends as I am wanting so you can see one of the pins is slightly out of alignment here. This loop is adjusted when knotting (see below).
You can see here that the misaligned pin is removed as the last knot is worked on row 2 (the ball thread end then being tightened up). The other pins sit on the diagonal path OK.
Happy with my finished corner – finally – ha ha.
Block Printing:
Next I wanted to create a pretty block printed border.
I used the lime green paint on the outer part of the block (applying with kitchen sponge).
I mixed a little of the Raspberry and Violet with quite a lot of White to create a colour that matched well with my lilac thread. This mix was sponged onto the inner section of the block for printing.
The scarf was laid onto the foam base for printing. This provides a little cushioning against the solid wood block ensuring that the detail prints well.
Oooh yummy print.
Oooh – I was a happy bunny. I left the paint to fully dry overnight then heat fixed by ironing on the reverse on a cotton setting.
I then hand stitched on the lace border easing it to fit. In order to provide a little stretch and ease I used a slight zig zag when stitching (this allows a little stretch without popping of the thread). Next I sprayed with starch and ironed. This smoothed any slight lumps & waves that formed after attaching the lace and also stabilised the lace nicely.
I was so chuffed with how the lace border and printing looked.
The Floral Daisy Motifs:
Next I worked 16 small daisy motifs on loom 3.
I stretched the web on the smallest circle and lime thread to create 16 edge loops (i.e. total of 32 threads crossing the central section).
I then worked DD (double darning 2e) for 2 rows in the centre to neaten up the crossing threads etc. On the second row I offset the threads darned in the first row (as in weaving).
I then worked Revs (2) for 3 rows: Reverse backstitch over 2 threads. Ensuring that the threads from adjacent ‘loops’ were grouped together to form the outer ‘petal’ loops. Note: The side facing you is the back of the work.
Then I worked K 2e for 1 row: Knotting 2 threads together to secure groups of threads creating the long scalloped edge loops that make the petals.
These little flowers would make great earrings or could be joined to make a lovely necklace. In fact it was these that gave me the idea for my black lace earrings blogged in my previous post earlier today.
Finally I finished the shawl by sewing the little daisies into the centre of the block printed motifs.
I hope that you like my lace shawl. Teneriffe Lace is definitely a ‘slow craft’ akin to knitting or cross stitch, don’t expect quick results. This project took me around 25 hours to make! Take your time and enjoy the process xxxx.
Gina is launching a brand new Thread Wrapped Button book on The Craft Store TV channel tomorrow at 10am (Sat 23 October 21 – Freeview TV channel 85 – or watch live or on catch up via their website).
It will be an extra special show celebrating 10 years of crafting on TV. There is going to be a freebie gift with purchase – gorgeous stamps for embroidery. I made these button earrings with my set.
Check Gina’s website (Gina-B-Silkworks.co.uk) for lots of button making supplies and resources (including her new book following the launch show).
The birdies and button borders were stamped onto cotton sheeting with Versacraft ink and iron fixed (to set the ink).
The buttons were then embroidered using 2 strands of cotton.
The button gauges were used to draw stitching lines for button covering.
The designs were cut out and running stitches worked to gather up around the button moulds. Curtain interlining was used to lightly pad the embroidery designs.
The backs were then covered with felt to neaten.
Beads were added to the eyepins and pliers used to make wrapped loops which were stitched to the buttons. Earring wires were attached.
I used the anniversary stamps to decorate a tag for display.
Love these cute birdie earrings – think that I will have to make some for myself (these flew off to Gina for the TV show). Hope that you like them.
Gina is launching a brand new Thread Wrapped Button book on The Craft Store TV channel tomorrow at 10am (Sat 23 October 21 – Freeview TV channel 85 – or watch live or on catch up via their website). It will be an extra special show celebrating 10 years of crafting on TV.
Check Gina’s website (Gina-B-Silkworks.co.uk) for lots of button making supplies and resources (including her new book following the launch show).
I first made a pyramid wrapped test button using the 25mm mould (bigger is always easier to start when practicing) according to directions in Gina’s book.
I then made the earrings using 20mm moulds. Using 3e in purple for the foundation and a slight variation of the method for the pink wraps – 2e wraps in the pink. This provided more thread coverage over the back of the button (so I didn’t need to cover workings on the back with felt to hide). I worked a small button hole loop at the top to attach earring wires (jump rings could be used).
Really cute and not too heavy for wearing. Hope that you like them.
Gina has another TV show on The Craft Store on Sat (23 Oct at 10am). It’s going to be a special show celebrating 10 years of Gina appearing on crafting TV shows with a brand new book launching too, featuring one of her specialities – thread wrapped buttons.
Here are a few of my thread wrapped buttons using techniques from Gina B Silkworks – I am going to put some of these into a journal so that I can keep a reference.
Various Deaths Head buttons using a variety of threads, colours and moulds.A variety of thread wrapped buttons – various techniques.More lovely thread wrapped buttons
National Button Day is coming soon – 16th November. I will share more of my buttons and projects made with them over the next few weeks.
Good morning. This is the last of my guest posts for Chocolate Baroque this month. I had planned a completely different set of projects but just had designer block! Horrible when that happens, especially when working to a deadline. This happens to us all at times, particularly this year with all the added stresses.
After several days of wasted effort I just stopped working on my original plan, went away from my desk and tried to clear my head. I then went back and decided to just ‘go for it’ – no plan, no nothing. I just picked up stamps and got started. Finally ideas started to flow – phew. I find that this usually works for me, although it is not always easy to do – ha ha.
I hope that you enjoy my offerings. Everyone take care and enjoy Christmas as best you can. Spring will soon be here and I am hopeful for far better times to come soon. Big hugs Anne xxx.
Blue and White Mandala
This one is a quick and easy make using the lovely mandala style stamp.
Materials Used:
15cm square white card blank, decorative die cut circle in blue card and scrap white stamping card
The background paper was trimmed and edged with black marker. The base texture was stamped with black Versafine.
The main image was stamped with blue Versafine, the card trimmed to approx. 9 X 13cm and edged with black marker. The floral section was stamped again with black Versafine. The stem was extended by drawing with black pen and the image cut out.
The topper was then spritzed with water and Brusho powder dropped onto the wet card. When dry the monochrome Hydrangea was glued on top, curling the edges up slightly for dimension.
Floral Thank You Card
This one was a super quick make. Ideal if you have a last minute card to do.
Note: I used a stamping platform for this project. Not essential but it helps to realign when over stamping.
How it was done
The watercolour card was spritzed with water and stamped using a mix of the Distress Inks. These bled out giving a lovely watercolour effect.
When dry the image was overstamped with Versafine. Versafine was also used to stamp the border and sentiment.
Dreamy Elephant Card
I love the Indian themed stamps from Chocolate Baroque – definitely amongst my faves. To save a bit of time I again used a pre-printed background paper.
Materials used
15cm square white card blank, Crafty Individuals 6 X 6 inch background paper (Book 8 A Weekend in Seville), and scrap white stamping card
The sentiment and base texture was stamped and embossed with copper powder.
The flowers were stamped with Versafine. The background was then edged and embossed using the embossing pen and copper powder.
The elephant was stamped onto white card with Versamark and embossed with gold powder. The image was then coloured with pencils and pens and cut out. The elephant was lightly shaped and glued down with 3D glue gel for dimension.
Looking forward to Gina’s button show on Hochanda TV today at 10am (Freeview channel 85 or can catch up and watch via the Hochanda.com website). So many gorgeous button making kits.
I have had a play with some of the latest kits.
Brand new Plushwork kit out today – I love these little fluffy textural treasures.
Also beautiful stamp sets for embroidery.
I have made some Georgian style buttons.
I made a few embroidered items with the Elizabethan inspired stamps too.
Hi everyone. I am delighted to be a guest designer for you this month. For my second set of projects I have had a play with the lovely new Gerbera and Friends stamps from Annabel. Love this set. Hope that these give you a few more ideas and fun playing with some of your stash.
I have also finally finished the last of my Christmas card batch making – phew. Why do I always leave them until the last minute! Ha ha.
I created a couple of cards using the lovely dandelion clocks. I remember as a child how we would blow the seeds from the flower heads whilst making a wish. Happy memories.
My card blank measured approx. 13 X 17.5cm. I trimmed my stamping card to 12 X 16.5cm and rounded off the corners.
I painted on the water based inks, blending them wet in wet (working from the top down). When dry I flicked with water and lifted out colour with tissue to add texture. I also applied a circle of water and lifted it out to create the moon.
The dandelions, sentiment and foreground texture were stamped with Versafine. I lifted out some of the colour from the seed head bases).
I also used Distress Ink to stamp more texture at the base and to blend around the card edges. Black alcohol ink pen was used to edge and frame the card before mounting.
My next card was more clean and simple. The card blank was 15cm square and the blue background mat was trimmed to 14.5cm.
I used dies to cut the decorative circle (approx. 14cm diameter) and circular centre (approx. 9cm). A white paper doily would also look good if you don’t have decorative dies.
The images were stamped with Versamark and embossed with white powder. I mounted with 3D foam for added dimension. Finally finished with PVA pearls.
Bright Gerbera Cards
I adore this huge Gerbera stamp and wanted to make something really bright and cheery.
My card blank was 15cm square. I trimmed black card to 14.5cm to create the background mount, and white stamping card to 13.5cm.
The card was painted with the yellow, red and magenta inks, blending them outward from the centre. Versafine was used to stamp the images.
Oh that Gerbera!
Again I used a 15cm square card blank and trimmed a black mat to 14.5cm. The background texture was stamped with Versamark and yellow/gold mica brushed over with a soft brush. Excess mica was removed with a microfiber cloth. Versamark was then applied around the edges which were embossed with metallic gold powder.
The sentiment and leaves were stamped and embossed onto black card. An embossing pen was used to edge the sentiment plate.
The Gerbera was stamped onto acetate and shrink plastic using Stazon which were then cut out.
The back of the shrink plastic was coloured with alcohol pens before shrinking with a heat gun. Coloured pencil was used to enhance the colour on the front before covering with Glossy Accents.
The back of the acetate image was coloured with mica powders mixed with mat medium. When dry the back was then painted with the metallic acrylic.
The photo really doesn’t do justice to the shine and mica sparkle on the Gerbera. Love this one.
I love these collage panel style stamps for creating quick and easy batch makes – one stamp does all the work for you. I have stamped and coloured these but they would look equally good without colouring or perhaps stamped and embossed with a pretty metallic powder. I like to use a stamping platform for batch making as it makes it easy to line up and repeat stamp in a production line.
Stamped with Majestic Blue Versafine and coloured with Distress Ink (Chipped Sapphire).
I just had to make a blue and white set. Those of you that know me will know that I love making these. However, I have been a little out of practice with my stamping and colouring this year and my first attempt was a flop – ha ha. I have shown my blooper as I thought it may be helpful if you have struggled with colouring.
This was my first attempt – eeek! Initially I tried to colour with watercolour pen and attempted blending out with a damp brush. It wouldn’t work very well and my watercolour just sucked straight into the card. This really shows the importance of choosing the correct type of card for the techniques that you wish to use. For watercolouring you need a card that will hold the pigment without it bleeding out too much, but then release it again when water is applied to allow blending and shading. This brand of card used to work well but recent batches really have not worked as well so I suspect they have changed the ‘formulation’.
As my watercolour pens were not behaving well with my card I tried switching to Distress Ink. Applying to my mat, diluting out and picking up with a damp brush. Distress Inks are specifically formulated to stay wet longer and to blend more easily. It worked out much better on this card. The two flowers on the left were my quick trial with Chipped Sapphire Distress Ink.
Another mistake I made was to go in far too heavily with the colour. I was aiming for a softer colouring more suitable for the delicate flower petals. This is achieved by using a more diluted colour and gradually building up the layers and shading.
This shows the first stage of Distress Ink colouring using very dilute ink.
Deeper colour was then added to give shading. Working more heavily on the leaves and stems helped the delicate flowers to stand out more.
The edges of the card were distressed (using the edge of my scissors) to give a soft textured border before mounting onto the card blank. Lastly sparkly glitter glue was added to the flower stamens and around the edges. Cannot have Christmas without at least a little bling.
My next set were also coloured with Distress Inks. I went quite dark on the leaves to enhance the delicate flowers.
I was pleased with the delicate vintage look.
Next I coloured with soft pastel coloured alcohol ink pens.
Again my first attempt at colouring this batch was not really what I wanted. I felt that the flowers were a bit too much, too Summery and had lost their delicacy. Despite this I mounted this one as good enough.
I was happier with this colouring for the wintery theme. Coloured pencil details (outlines, leaf & petal veins) were added in to enhance the soft colouring.
Glad to have finally finished my Christmas cards – now to get them all written up and posted.
I will be back again next week with some more stamping play x.
Hi everyone. I am delighted to be a guest designer for Chocolate Baroque this month. My first offerings are some Christmas makes. It’s been a tough year for us all and this Christmas is not really going to be usual. However, lets hope that time goes by quickly and that we can look forward to better times ahead with our friends and family in 2021. Lots of hugs, Anne.
CHRISTMAS LANTERN
My first project is a pretty Christmas lantern. I mixed & matched lots of stamps on this one but just had to include my absolute fave reindeer stamp.
Woohoo – all lit up.
This one is to be gifted to my 96 year old friend who I help care for. We are having Christmas together as I am in her support bubble. I think that she will love it.
Materials List
MDF Lantern approx. 12.5cm wide and 20cm height (this one was from Mad Hatters but any similar could be used)
Embossing powders: detail white, white with silver glitter, and pale blue glitter
Heat resistant acetate and smooth white stamping card
Red liner tape (strong double sided tape)
Wired Christmas ribbon
String of small LED lights
Pretty 3D scene with house and trees.
A close up – oh that reindeer!
Adding the acetate baubles helps to blur and disguise the side edges of the card cut outs creating the scene.
How it was made:
1. The bare MDF lantern was coated with white Gesso (primer).
2. When dry it was painted with acrylics. Gilding wax was added around the ledges.
3. Versamark was applied through the stencil onto heat resistant acetate to create the Winter sentiment. It was heat embossed with sparkly white powder, cut out and attached to the lantern with strong tape.
4. The snowflakes border was stamped and embossed with white glitter powder 4 times, cut out and taped to the top portion of the lantern arches. Two large baubles were also stamped, embossed and cut out.
5. Extra snowflakes were stamped and embossed with white or blue glitter powders, along with a few twiggy branches, and cut out ready to use as embellishments.
6. The main images; 2 large background trees, the building scene, smaller foreground tree and reindeer were stamped with Versafine and cut out. In addition pine cones were cut out from the stamped pine branch stamp.
7. Images were coloured with watercolour, glitter and gel pens.
8. Now for the messy bit – ha ha. The glitter gel was used to coat the base and spread on top of the ledges. Some was also applied behind the acetate to help glue it in place securely. I had this heavy bodied thick glitter gel in my stash for years. It really needed using up as it had started to set in the pot. Some of the half set chunks were stuck down into the wet gel for added dimension. For added sparkle I also dropped in some of the chunky mica flakes. You could substitute heavy bodied acrylic medium and add glitter for similar results.
9. The stamped images were anchored into the wet gel to create the scene. I just had to add a little bit more sparkle over the images with clear glitter glue too.
10. Once the glitter gel medium had dried I did a bit of dry brushing with white Gesso in some areas to add more snowy effects.
11. The light string was then arranged to light up the background house and trees, and to light up the foreground tree. The wires were anchored with strong tape at the back of the images to help hold them in place. The switch was hidden behind the large background scene images.
12. The acetate bauble images were added to the sides with red tape. This helped blur the view through the sides of the lantern where just side on edges of the card elements were visible. It may have been better to stamp the sides as one complete panel but I found that I needed easy access to the inside in order to arrange the stamps and lights.
13. The ribbon bow was added to the top. The acetate snowy sprigs and pine cones were added to embellish the bow. The glitter glue gel was used to anchor everything in place. Extra snowflakes used to embellish too.
ROBIN SCENE CARD
Every year I end up leaving my Christmas cards until the last minute so I decided to do a couple of projects that would be fairly quick and easy for batch making. I always use my stamping press for batch making – it makes it so much easier to line everything up and repeat stamp multiple times.
I hope that you like this robin scene card.
I added extra inking around the outer edges of this one but decided that it really didn’t need it so didn’t do it on the rest. I just had to get on with that batch making! Ha ha.
Sparkly glitter glue (Stickles Icicle, red and gold) and Glossy Accents
Sparkly organza ribbon
How it was done
1. Images were stamped with Versafine and cut out.
2. The main image was coloured with watercolour pens and mounted onto Kraft card. Glossy Accents was used to add shine to the Rosehips, and glitter glues added for sparkle.
3. The snowflake borders were stamped directly onto the card blank with Distress Ink.
4. The ribbon was glued down and the main topper added. The sentiment was also mounted onto Kraft card and glued in place. The branch was lightly shaped before gluing.
5. Finished with more dots of glitter glue. Hey – you can never have too much bling – tee hee.
Note: I kept these fairly flat for ease of posting. 3D foam could be used for more depth if desired.
CHRISTMAS TREE SHAKER CARDS
Who doesn’t like a shaker card? Scenic panel stamps make them really quick and easy for batch making. These were quite tricky to photo due to shiny acetate and all that bling. Hopefully you can see enough detail of the lovely glittery snow behind the acetate windows.